
how to bake the perfect hockey stick
It's been a solid six weeks since I last posted....so much for more frequent posts. :p
I've never had a guest blog post on this blog....and it seems it's the thing to do lately. So I then I thought...who better to have guest post on my blog, than the one person who figures most prominently in it...after yours truly - hubs!
Also, hubs has been bugging me to post. He's shared a recipe on here before (to great critical acclaim, I might add) so I figured it wouldn't be too much of a stretch for him to guest blog on here.
So I acquiesced...partially because I thought you'd enjoy hubs' offering....but mostly because I like the sound and spelling of the word 'acquiesce.' All those vowels make me happy. Enjoy.
---
When Leslie asked me to write a guest blog entry, I thought hmm… where does my true expertise in the kitchen really lie? What do I know and love that could manifest itself in a passionate blog post? What sort of unique, interesting “secret recipe” could I share with her devoted readers?
And then it came to me.
How to Bake the Perfect Hockey Stick
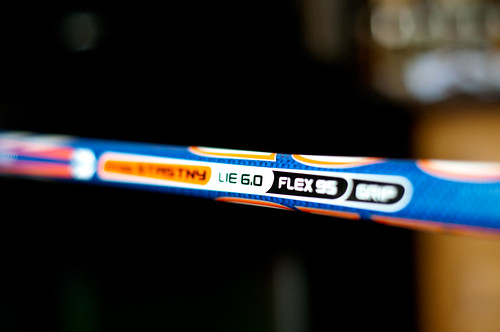
Stastny pattern, 6.0 lie, 95 flex. If this is Greek to you, go here.
I’m not sure if the wife has ever mentioned this on the blog, but I’m a little hockey-crazy. I’ve been playing nearly non-stop since I was four, and I’ve always been a little picky about my sticks. I can remember being 10 or 11 and holding my Sherwood hockey stick blade over a glowing hot stove element to heat it up so I could modify the curve to my liking. Since then I’ve been continuously fascinated with the various ways that some of the NHL’s elite players customize their sticks.
But I’m getting ahead of myself; a bit of a backgrounder might be necessary here for you “foodies.” As you are probably aware (or at least should be), hockey sticks come in all different shapes and sizes. They have traditionally been made of wood, but in recent years a new breed of composite sticks have supplanted their traditional counterparts and are now common at virtually all levels of hockey.
These new sticks are typically made out of materials such as kevlar, fiberglass, or carbon fiber. As such, these sticks do not warp or absorb moisture, and offer several benefits over wooden sticks such as better torque and more consistent flexibility.
Never Quite Right
Interestingly enough, despite the fact that most NHL players get sticks made to their exact specifications, there is a long history of players “tweaking” their sticks (and never being happy with them). For supplemental reading, see exhibit A, exhibit B, or exhibit C (jump to 0:30 mark).
Unfortunately, composite sticks are little trickier to customize than the old-fashioned wood sticks. Gone are the days when you could just grab a blowtorch, heat up the blade, and then bend it with your hand. Well, ok… technically sure, you can try this with a composite stick. But good luck. Composite sticks are notoriously brittle, and if not treated properly will simply fold like corrugated cardboard instead of curving.
So anyways, there’s the backgrounder. And now, my secret recipe.
Ingredients
- 1 hockey stick*
- 1 pair insulated work gloves (oven mitts will work too)
- 6-12 clamps of assorted sizes/shapes
- custom mould for new blade curve**
- 3M Super 77 spray adhesive (or suitable substitute)
- hockey tape
Serves: 1
* preferably cheap, because you don’t want to learn the hard way on a $140 stick. For best results, start with a pattern that is at least somewhat similar to the finished product you intend to create. In hockey terms, don’t use a stick with a pronounced down-show or “heel” curve if you intend on making a kick-ass up-shoe (“toe”) curve. Costco has been selling a great Sherwood composite lately for $39; Stastny pattern, 6.0 lie, 95 flex.
** This is crucial; don’t try to bend the blade manually with your hands (see notes about folding like cardboard above). I fashioned my mould from a chunk of 2x4, assorted saws/planes/sanders, and duct tape to smooth it out, fill it in, and get it just right.
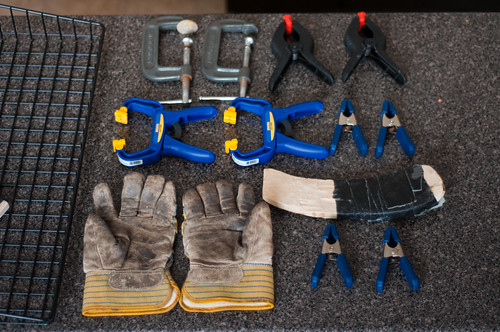
tools of the trade
Instructions
1. Preheat your oven to 500F (225 C). That’s right, I said the oven. Save your blowtorches for crème brulée; when it comes to composite sticks it’s oven FTW.
2. Remove all oven racks except one, and place it in the lowest position.
3. Fill a nearby sink with cold water.
4. Turn on the exhaust fan and/or crack a nearby window to minimize fumes. I’m not a scientist but I wouldn’t be surprised if some of the materials in composite sticks are carcinogenic (or at least bad for you) so I always try to keep the area well ventilated.
5. Insert stick blade-first into the oven and close the oven door as much as possible.
6. Bake for 5-8 minutes. Be careful because if you try the following steps too early, you may end up doing it twice (which will weaken the blade). When the blade is ready, the existing curve will begin to straighten, and your girlfriend/wife/mistress may start to complain of the smell. The blade will make a dull thudding sound when tapped on a hard surface, as opposed to the sharp tapping sound it would usually make. Exterior coating may swell or bubble slightly; this is normal. When overcooked, paint will begin peeling from the blade and/or shaft. As I say to the wife, it’s all about knowing when to pull out.
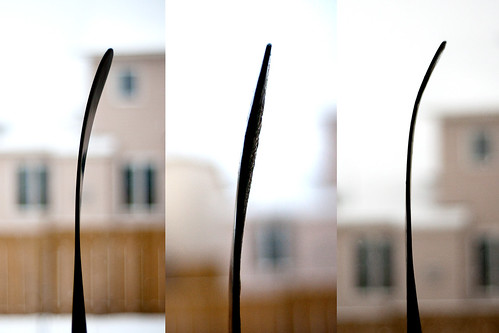
blade as seen a) with original curve, b) directly out of the oven, and c) with final modified curve
7. [OPTIONAL]. While the blade is heating, mist your mould with something like olive oil. This will prevent your mould from adhering to the heated blade (particularly if you’ve wrapped your mould in duct tape as I have). Note that you will have to wash the blade afterwards or your hockey tape won’t stick.
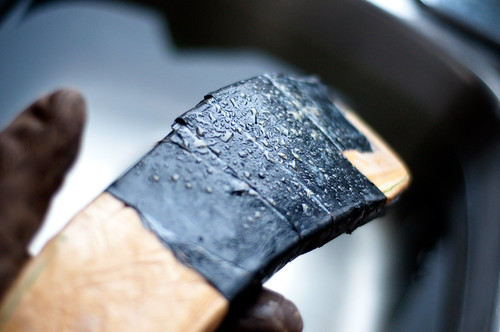
yes, that is a light mist of olive oil. I used the wife's misto.
8. When the stick is ready, use gloves or oven mitts to remove it from the oven. Immediately place mould into position and begin applying clamps. Start at the middle of the blade and quickly work towards the toe and heel. Do your best to place them in a manner than does not cause any severe bending along the length of the blade, or it may fold.
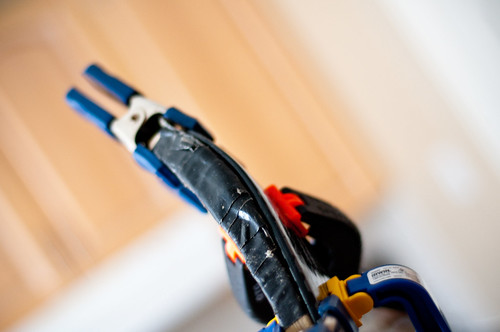
heated blade with mould and clamps in place
9. When happy with the curvature of the blade and positioning of the clamps, immerse the entire blade and clamps in the cold water you prepared in step 3 (as much as possible). Let it set for 10 minutes to give the blade a chance to cool completely.
10. Once the blade has cooled, remove clamps and wash if necessary (see step 7). Take a long hard look at it. Handle a puck with it on the kitchen floor. Is this the curve you want? If not, go to step 5. If, on the other hand, it’s freaking AWESOME, then turn off the oven (I typically forget this step).
11. Grab your 3M Super 77 and go outside. I don’t care if it’s cold; you don’t want to get spray adhesive on pretty much anything in your kitchen, or wife/girlfriend/mistress could get angry. Lightly coat both sides of the blade, paying special attention to the bottom.
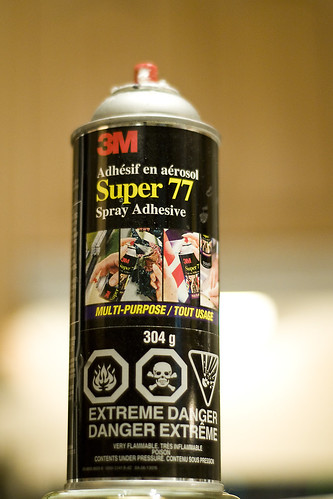
Super 77: EXTREME DANGER, BITCHES.
12. Quickly go back inside and tape that sucker up while the spray adhesive is still tacky. Using the spray adhesive will extend the lifetime of your tape job, so you won’t find yourself doing this after every single game.
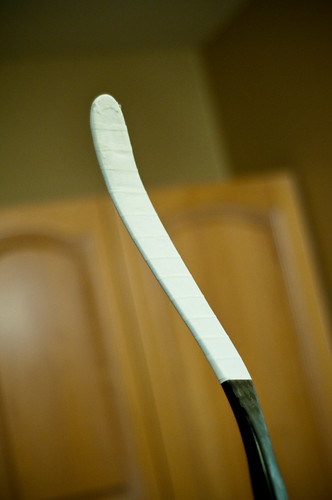
the final product, in all its unabashed glory
13. Smile. You are holding a thing of beauty.
Disclaimer: for all of the science behind their manufacturing, composite sticks are finicky things. Even under normal conditions some sticks will snap after only a game or two, while others will seemingly last forever. Your mileage may vary depending on how smoothly the curve-alteration process went, but I’ve found that it generally has a minimal effect on the lifespan of the stick.
That’s it folks! Thanks for reading.


8 comments:
Haha I know nothing about hockey sticks but the "Extreme danger, Bitches!" got me cackling so loud that I almost woke up the little one.
A+
Ah, the stank of melting hockey stick, I know thee well.
I say you haven't lived until you've had melted hockey stick all over your oven (or cooktop, if he's just replacing a blade). Good times. Better times are explaining to your guests why the oven that's baking the holiday ham smells like plastic and chemicals and hot cancer, all rolled into one.
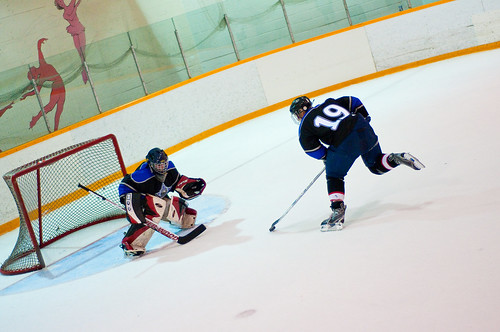
Even with the perfect hockey stick, you could still lose. Like any other games out there, experience would definitely be your best teacher.
I would never try this myself haha I was terrified enough just putting a blade on a shaft!
Bauer Supreme One.4 JR blue composite shaft/5.0 lie, right-hand, NXG blade with PM9 curve (perfect for an ambidextrous player. Yes, I'm proud of that.)
Followed these instructions today and they worked perfectly. My only advice would be to take applying pressure to the blade in the mold slowly if the change to the blade is going to be quite extreme. I put mine between a pair of books and dumped weight on it (was going for a flat blade), but it developed a small fold on the backhand side.
Also thats a hell of a toe curve there. Almost looks like the new McDavid blade patterns that were everywhere the last time I went to look at sticks
There's a new McDavid pattern? Oh man I need to go look for those! For a while I've been using the Gionta pattern because I didn't even need to modify it, but it's been discontinued. Thanks for the heads-up!
-Brad
Post a Comment